Showing posts with label Crafts. Show all posts

Friday, July 19, 2019

GETTING READY FOR MORE CHANGES

We are getting ready for more changes, as we ordered two steel structures, one 12x20 car port, that will go down by the old calf shed. this will be the new barn for the Billy Goat and his weather friend (actually his first son born here).
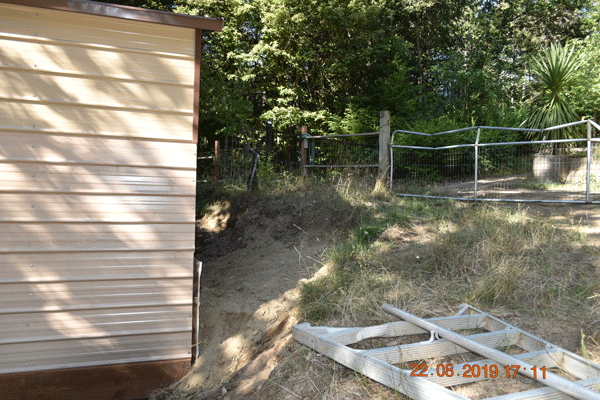
 In this picture you are looking down from just below the gate to the pasture. The carport structure will run length wise to the red line in the photo. the other side will be along the front of the shed, although the roof of the car port will be straddling the front of the roof of the shed. The ends will be open when first installed, although we plan on adding 2x12x12' pressure treated boards to the closest end to make a short, three foot, retaining wall.
 this picture is pretty dark so you have to use your imagination as to the structure going across the front of the shed. It will run from about one foot to the left side of the shed in the picture over the front of the shed for twenty feet.
 Finally got to play with my transit I had purchased some years ago. Kind of a learning curve but not to terribly bad. Don't pay attention to the mangled gate up above, some oak trees fell on it a couple years ago, it is going to be replaced.
We have started putting down some deck blocks for the building frame to sit on, at this point we have four of the pier blocks set for the building to sit on, on this side.
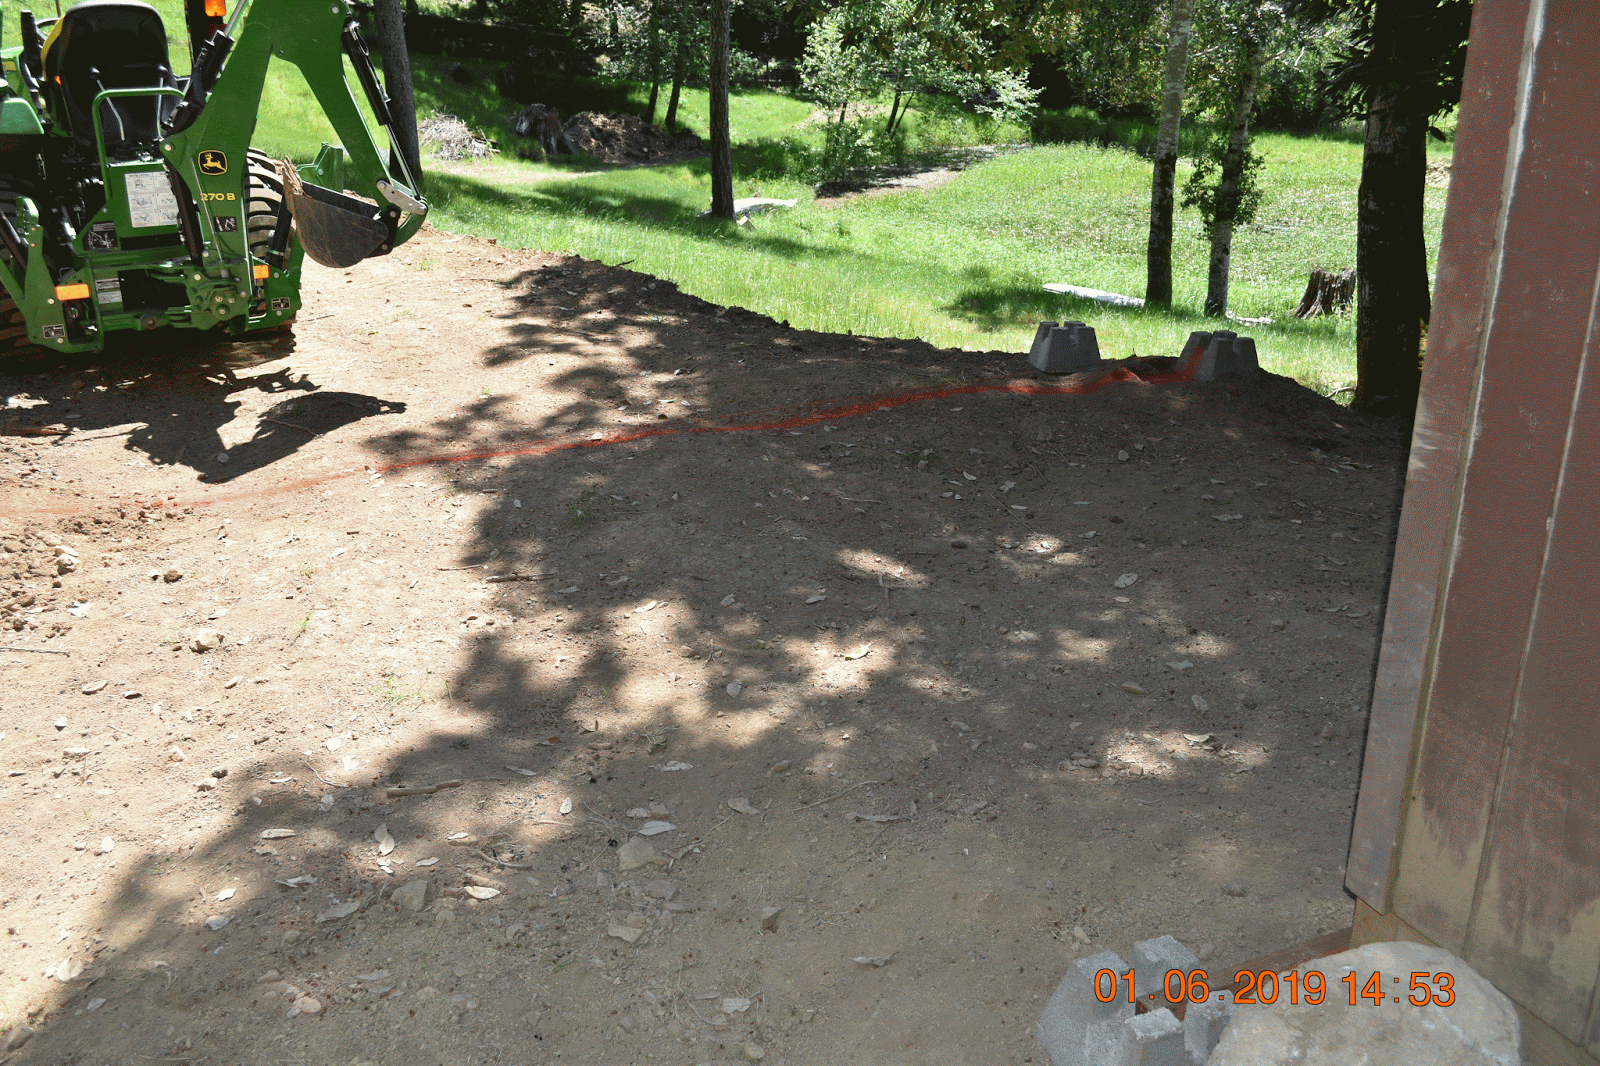
 This is looking at the other side away from the shed, at this time we only have the two corners set on this side.
 This is just another view from lower in the pasture.
Janice is a great help and worked very hard on this project right alone with me, Maybe harder.
Well we finally have the basic structure installed that will be the living abode for the boy goats. we just added a simple carport over the front of what used to be the calf shed.
this is a view from what will the back of their barn. we are going to build a four foot retaining wall immediately at the rear of the structure and then add greenhouse plastic for this wall so they get good light and are protected from storms. to the right in the picture we plan on building a feeder into the wall of the carport with a roofed hay storage area immediately behind that. I was able to get the construction people to leave some extra metal they had which I will use to fill some areas such as the gable ends and the upper side above the calf shed.
The side that only has upper tan metal we are going to leave open as this is the side facing away from most storms. the end facing down hill will be left open so we can get in this the tractor to clean the area out.
this post is far from complete, but I am going to post now and make additions as we progress.
We are making progress, we have about half of this side done. to finish this side we need to finish installing the 2x12s along the bottom, and some metal and greenhouse plastic on the far two sections, between the uprights.
I have some retaining wall done on this end, now I need to fill the peak with sheet metal and install greenhouse plastic between the retaining wall and the sheet metal in the peak. in this picture you can also see the oak stump I have cut on in order to build a small hay storage and feeder along the side where the ladder is leaning now.
Here you can see the sheet metal I have installed above the old calf shed in order to incorporate it into the barn for the boys goats. Actually only one piece is installed as the second is currently only clamped into place.
 Well I made a little more progress. This end is almost complete, just need to finish the metal up in the peak. filling the little side piece was kind of a pain, but at least it is done.
in this picture you can see I have gotten metal up on the last four foot section on the left, along with some flake board inside to protect the   metal from the boy goats.
The open eight foot section is where we will build a feed shed and feeder.
I still need to bury this culvert and get the French drain installed at the end of the barn and feed shed.
 I really like this side of the barn now that the 2x12s, sheet metal and greenhouse plastic are up.
I started filling the back behind the barn, although I still need to install the French drain across this end in a gravel bed as I finish filling.

Tuesday, October 9, 2018

SPRING 2017

Wow this post is very very late being put up as life has just gotten in the way this year. This spring I started setting up my Rock shop again. I used to cut stones a lot of years ago, but have had stuff packed away for a lot of years.
When I started this post it was in the spring of 2017, now it is the fall of 2018, just a couple of years late.
I picked up another faceting machine, a facetron like I had before. I really love this machine. easy to use and very accurate. Both of my sons even tried to learn to use my last one. currently I have a pretty good selection of laps, as can be seen in the corner behind the facetron.

 This little Lortone combination cab and saw is like the last one I had also, the grinding is set up with diamond for fast cutting. The sanding drum, I still use carbarundum belts on an expanding drum. diamond belts are available but these are currently cheaper.
and on the other side of the room I have set up my jewelry fabrication area. this is the area where I keep my rolling mill, pickle pot, tourch, and other assorted items. 
Cutting rocks and making pretty things is a fun hobby and something that I can do when it is wet out or cold which happens now and again.

I also have a 24 inch rock slab saw and lots of rough rock, Agate, Jasper, Obsidian, etc.

and in the corner I have my polishing area. Presently I'm only have my rock polisher, but will soon have a metal buff as well.
This is my Richardson Ranch stone polisher.
 OK, so I may have a few slabs of rock
The slab saw I purchased this year is in very good condition, although I do need to build a guard for the belts and pulleys on the left side of the machine. 
Also if I run out of slabs, this is my excess rough rock.
I am still lacking a casting machine. I have plans on building a vacuum machine out of stainless steel.


Wednesday, October 12, 2016

SPRING BREAK 2016

Well Janice was needing to go down and visit her parents this year and since I can not reach my left foot, one of my Grand Daughters, Natasha, came to stay with me while Grandmother went to California. Natasha and I enjoy doing projects together so I had already decided that we needed a new incinerator door and frame.
 As one can already tell the first door and frame were made from scrap steel, and after being in place for almost sixteen years they needed replacement badly.
At first I thought that I would only need to replace the door, wrong, the frame was just as badly rusted away.
 Natasha really like to do photography also. So she caught me fitting the door to the frame
 Natasha did a good job of catching the sparks off of the grinder.
 This is one of the hinge tubes Natasha welded on, not bad at all for a first time welding.
 The design for the new door and frame really didn't change much, although I had decided to add a handle connected to some linkage, in order to work the door latches. Natasha let me know right away that I should have stayed with the old design, but my reply was "we had to make it interesting."
OK, OK so she caught me smiling.
 Toward the end of our project Janice had gotten home and was in the basement with Kaitlyn painting, so Tasha took our knob in and put this spiffy new paint job on it.
 Got all of the old caked on ready to install the new frame and door. scraped off of the incinerator ready to install the new door and frame.
 As you can see from this picture I even designed a couple of damper vents into the new door.

Natasha was correct from the start. Because of the allowance for space in the joints so the linkage would not rust tight, the whole setup was too loose and I had to remove the linkage and go with separate handles.
All in all the visit with Natasha went very well, I really enjoyed her visit. We did get into a little trouble when I told her Dad, I had taught her to do "cookies" in the jeep.

Friday, April 8, 2016

NOTE ON GRAFTING

Well I tried six Cleft Grafts last year, only one out of six were successful. I know that this is a low percentage graft, but I think some of the failures must have been because of something I did or did not do. 
Also, we had to move an apple tree and some roots made small unknown trees, so like any determined gardener, I re-potted them.
This spring, actually just the other day. I grafted these small trees. most were grafted with the purchased tool, but I did do two whip grafts. Three of the little trees were already grown into small branched trees, and with these I top worked, or in other words did multiple grafts, on the smaller branch wood The pictures below are some of the grafts That I just completed about a week or so ago.


All of other grafts look to be taking thus far, I grafted them all to honey crisp, just because I like that variety. The large tree in the yard that was a Spartan appears to have those grafts taking hold also.
. I will try to keep everyone updated.

Friday, March 11, 2016

NEW RESIDENT

Well Grizzly Mountain Gardens has a new resident. Her name is Sadie, and she is just over a year old, still a puppy. New resident besides the new baby goats. We adopted her from the local Shelter and feel so very lucky to find such a wonderful pure bred dog. Part of the fees from the shelter was license and micro chip implanted.

Thus far she is adapting very nicely into our family, except the cats are not real happy. Shadow the African Grey Parrot is not too sure of her yet either. The two of them have been nose to nose and she hasn't been bitten yet, and she has not tried to eat him either, so that is a good thing. We stopped at Woof's Dog Bakery on the way home with her and picked up food, bed, leash, etc. 
Currently she is a companion for Janice and I want to keep it that way, although she shares time with me also. She is a really GREAT watch dog, and so far the deer don't like her either, so are staying out of the yard.
Here she is just getting used to the place, She has already made friends with Grizzly and Star our boy goats. Sadie has her outside and inside toys, and she claims sticks out of the kindling basket. She goes almost everywhere with us and is liking the going quite a lot. She still needs to learn the chickens are not for her to chase.
Sadie loves hugs from Janice or I. Sadie started life down in California, apparently the folks who had her had the parent dogs as well and she was bred, too young, by her sire. She aborted the puppies but was so young her body could not rid itself of the aborted embryos and she got terribly infected and almost died. She was relinquished to the shelter in order for them to pay for the surgery and Spay operation.


Friday, September 11, 2015

WHAT TO DO WITH A RAW GOAT HIDE

This weekend we needed to butcher our little billy goat, so because of this we ended up with a raw hide to do something with. Natasha helped me gut and skin the goat and voiced her desire to work the hide to keep, so we made a Fleshing beam. We had some Tan Oak logs at the back of the property, so we selected a short one, and used a draw knife to shave most of the bark off and smooth it as much as we thought we needed.


Then We hung the hide loosely over the fleshing beam and I explained to Natasha what we were trying to do, as far as removing any left over meat or fat from that side of the hide. We didn't have a fleshing knife, so we had to use a Machete with rags wrapped around the handle and blade, so no injuries would happen.

It took most of the day but Natasha was persistent and got it fleshed out. I have to say I was very proud of her persistence and work cleaning the hide for tanning.
And needless to say she was very proud of what she had accomplished. When the fleshing was done we submerged the hide in some tanning solution for seven days. At the end of the tanning period, Robert Hausmann, our grandson assisted me in stretching the hide on a wood frame I had made.
The hide was drying on the frame for about a week and actually tightened enough that some of the strings used for stretching, broke.
The hide at this point is pretty stiff, and Natasha happened to be back for the weekend, so we proceeded to build a scrapper for her to take home and finish the hide.
 In these two pictures the scraper is not complete, I need to clean the weathered surface of the antler, remove sharp edges and smooth out, and make the scraper edge curved so as to not cut through the hide, and maybe sew on some buckskin on the handle.
My grandchildren are absolutely beautiful! Even in a home tanned goat hide.
Hey pretty girls are always concerned about some fashion.
Maybe a hairy mini-dress?

Or could it turn into a coat for Scooby? 
OK, I finally got the scraper done, cool.