Monday, December 9, 2019

LOOSING CHICKENS AND DUCKS

Before I start on this story, I have been updating some other posts from 2018 forward, adding pictures etc.
Well recently things are not going well here on the homestead, we have lost five chickens and two ducks in the last two weeks. At this point we don't know exactly what is getting the chickens, but the ducks have been being taken by a Red Tailed Hawk. We know this from the lack of lost feathers and we were outside when one  was taken.
The first chicken we lost was in the boy goats pen, and taken back through the fence at the South West corner of our property. I promptly set three leg hold traps around the outside of that fence, two on the west side and one on the south side. several days later I was checking the traps and found one of my traps missing along with the rebar stake that was holding it down. At this point we were thinking the culprit was a Bobcat, but as more chickens were taken, we had two in one day taken, which sounded more like foxes.
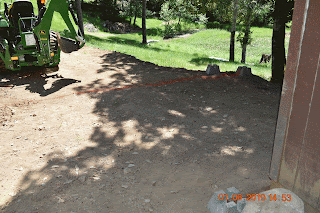
 This is the scene of the last attack, as you can see a lot of feathers on the end of the stock panels. this photo was taken at the edge of a dirt path down to the old well in the pasture.
 Following down the path leading to the old well, on the left is the scene of the second attack, on the compost pile, just past the large stump. I had set a live trap just to the other side of that pile baited with a piece of chicken. which leads to another side story, I was working down in the pasture on the retaining wall, when returning to the house asked Janice where Sadie our German shepherd was, she didn't know and about that time It hit me. I returned to the pasture and sure enough Sadie was in the trap, and had eaten the chicken (thank goodness it was boneless). Any way back to the latest attack, the trail of feathers led along this path toward the old well.
You can see the old well on the left top corner of the picture. I followed the trail of feathers along this to the three trees you can see just to the other side of the pond. now I am not sure what is taking the chickens as the feathers led to the fence and away on the other side, but there were also a few feathers up on the fence. since I am still not sure what is taking the chickens I moved the live trap (currently reset with fresh bait) down next to the fence. I am determined to get this chicken thief.

Sunday, October 13, 2019

FRUIT HARVEST 2019

Our Heavenly Father truly blessed us this year with a bountiful fruit harvest.
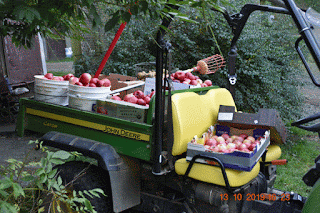
 Today Janice and I took three and a half hours to harvest our apples and Bosc pears.
 The variety of apples we picked are Spartan (a cultivar of Mackintosh) these were the two boxes at the front of the bed and the two buckets, these were the most numerous. Then there were the Liberty apples which are the two boxes stacked next the Bosc Pears (the dark green fruit in the left rear of the Gator. 
 Then came the Honey Crisp, love these, they are the box just left of the two buckets.
 The next variety was Freedom Apples, in the box on the passenger seat. the Liberty and Freedom Apples were both developed is a study in New York State. The freedom trees are still very small in fact this is the first year some trees started producing. we have a total of six Freedom Apple trees, one stating to produce pretty good several only had four or five apples this year, a couple had none yet.
 The next variety is the mystery apple. When we purchased the tree it was supposed to be a Yellow Delicious, when it produced it's first fruit it was green and stayed that way into November, so we assumed then it could be a Granny Smith. Well then the apples started to get a slight blush, and were decidedly sweeter, so now they are the mystery apple.
This is not to mention the Bartlett Pears and the Asian Pears that were ripe a month ago. I absolutely love the Asian pears, really sweet and supper juicy along with pretty crispy. We have three Asian Pear trees but this year we only harvested one tree, and one tree the Racoon's got to before we could, the other is not producing yet. I did not mention the two Fuji Apple trees, they actually produced very small apples but we need to move them to better locations as they are in well tiles alone the driveway and don't do well there. I also did not mention that many of these trees I grafted myself while teaching grafting for the local Master Gardeners.

Friday, July 19, 2019

CLEAN UP AND FIREWOOD

Well it is time to get the place cleaned up a bit. The hillside behind the house was getting pretty over grown, so we hire Matt Bailey, Budget Tree Service, to remove several large trees that were pretty dangerous and could have hit the house, with the neighbors permission. It took them several days to down the trees and chip the brush and it sure opened up the hillside, but there are still some to take down. We did not take any of the evergreens as per the neighbors directions. 
Well at this point I have most of the wood at least cut up, just a few logs left down here to cut and a couple up the hill to the south end of the property left to gather and cut.
 We have quite a bit of the wood split up also, between Janice her father, Emil, and I we have built a pretty good pile. Just for reference, that square garden frame leaning against the dirt pile in the back is four foot by four foot.
 some of the stuff cut but still needing to be split.

Every year we get very familiar with the splitter, and I think I am developing calluses on my bottom from sitting on that log. 
During the splitting process we generate quite a bit of kindling, hey it burns right?
All that is left of the large pile of wood, at least out of the woodshed, is some scrap bark.
The area all c,eared out.
the next two pics are the wood we put into the woodshed minus what we have already burned.
 Not a bad amount of wood for the winter, roughly three cords.
I had a picture of the kindling that we got from all of the chips, but at present have lost track of it.


GETTING READY FOR MORE CHANGES

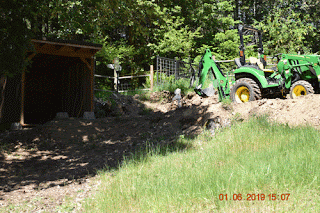
We are getting ready for more changes, as we ordered two steel structures, one 12x20 car port, that will go down by the old calf shed. this will be the new barn for the Billy Goat and his weather friend (actually his first son born here).
 In this picture you are looking down from just below the gate to the pasture. The carport structure will run length wise to the red line in the photo. the other side will be along the front of the shed, although the roof of the car port will be straddling the front of the roof of the shed. The ends will be open when first installed, although we plan on adding 2x12x12' pressure treated boards to the closest end to make a short, three foot, retaining wall.
 this picture is pretty dark so you have to use your imagination as to the structure going across the front of the shed. It will run from about one foot to the left side of the shed in the picture over the front of the shed for twenty feet.
 Finally got to play with my transit I had purchased some years ago. Kind of a learning curve but not to terribly bad. Don't pay attention to the mangled gate up above, some oak trees fell on it a couple years ago, it is going to be replaced.
We have started putting down some deck blocks for the building frame to sit on, at this point we have four of the pier blocks set for the building to sit on, on this side.
 This is looking at the other side away from the shed, at this time we only have the two corners set on this side.
 This is just another view from lower in the pasture.
Janice is a great help and worked very hard on this project right alone with me, Maybe harder.
Well we finally have the basic structure installed that will be the living abode for the boy goats. we just added a simple carport over the front of what used to be the calf shed.
this is a view from what will the back of their barn. we are going to build a four foot retaining wall immediately at the rear of the structure and then add greenhouse plastic for this wall so they get good light and are protected from storms. to the right in the picture we plan on building a feeder into the wall of the carport with a roofed hay storage area immediately behind that. I was able to get the construction people to leave some extra metal they had which I will use to fill some areas such as the gable ends and the upper side above the calf shed.
The side that only has upper tan metal we are going to leave open as this is the side facing away from most storms. the end facing down hill will be left open so we can get in this the tractor to clean the area out.
this post is far from complete, but I am going to post now and make additions as we progress.
We are making progress, we have about half of this side done. to finish this side we need to finish installing the 2x12s along the bottom, and some metal and greenhouse plastic on the far two sections, between the uprights.
I have some retaining wall done on this end, now I need to fill the peak with sheet metal and install greenhouse plastic between the retaining wall and the sheet metal in the peak. in this picture you can also see the oak stump I have cut on in order to build a small hay storage and feeder along the side where the ladder is leaning now.
Here you can see the sheet metal I have installed above the old calf shed in order to incorporate it into the barn for the boys goats. Actually only one piece is installed as the second is currently only clamped into place.
 Well I made a little more progress. This end is almost complete, just need to finish the metal up in the peak. filling the little side piece was kind of a pain, but at least it is done.
in this picture you can see I have gotten metal up on the last four foot section on the left, along with some flake board inside to protect the   metal from the boy goats.
The open eight foot section is where we will build a feed shed and feeder.
I still need to bury this culvert and get the French drain installed at the end of the barn and feed shed.
 I really like this side of the barn now that the 2x12s, sheet metal and greenhouse plastic are up.
I started filling the back behind the barn, although I still need to install the French drain across this end in a gravel bed as I finish filling.

THE PROPOSED NEW GREENHOUSE

As mentioned in another post this is going to be the second structure we ordered. it will be 12 foot wide by 40 feet long with a roll up door at each end, and will have teen foot side walls.

 This view is looking north toward the stalls we built for the horses, which is now the equipment shed. I had to excavate the areas for the pier blocks in order to get them level. we also had to tuck it up next to the back flower garden so we would still have enough room for driving into the carport.
 this is the view looking toward the house. Holy cow, this area has a lot of rock after being used as a driveway for the last forty years of so, we are going to have to dig out the interior and remove a lot of rock, then add a lot of humus and some good compost.
Sadie has been supervising all of out projects on the place sine we got her.
Well the frame is almost complete. I still need to add some support between the up rights and roof trusses to support some polycarbonate panels that are still to be ordered.

Another view, showing the roll up doors on each end. This is to allow me to drive the tractor with rototiller through the greenhouse after I dig out the rocky soil and replace it with good gardening soil,
I am going to post this now, but it is far from being done, I will add more as this project progresses.

Making progress on the new greenhouse. Our eldest son came over and was helping us start installing perlings and poly-carbonate siding on the new green house.
 This is the east side or back side, there is a lot of vegetation that needs to be trimmed up for more light.
 another picture of the back.
 This is the west side of the green house along the upper drive way. this side is not finished yet.
This is looking through the greenhouse toward the north east.The item under the blue tarp is my back hoe attachment.
making more progress on this project.
 as of today the shell of the greenhouse is almost complete. This end, the sides, and the roof are done, as wll as some short pieces of poly carbonate on the other end.
 We still need to clean up some of the brush up on the hill behind the back side wall and install some treated @x12's on the inside walls at the bottom to protect the plastic.
 This side will also have a path around for maintenance.
 looks a lot bigger since most of the shell is on it, 12x40 is a good sized greenhouse.
 This is the end away from the house, that is yet to be completed. it is hard to see from the picture but there are only two pieces of poly carbonate about half way up from the bottom, there are still five pieces to go up.
 This is an inside view from the opposite end looking toward the house, color me happy!